
Starlink is a great solution for the modern cruiser. We have been using Starlink on our boat for about two years. My goal for this article is to give you some good information to make an informed decision if Starlink is for you, to dispel some inaccuracies and give you some good options on how to install it.
On board we have many pieces of communications equipment, namely for weather and communications we carry IridiumGo, Garmin InReach, and Starlink. Starlink has proven superior to all of them and additionally you get the entire world wide web at your fingertips.
Iridium
Many sailors are very familiar with IridiumGo and the more recent IridiumGo Exec. Without going into a lot of detail, in my opinion what you get with these systems is inferior to Starlink, you don’t get true internet and it’s really cost prohibitive for the sailor. It’s my opinion that the Iridium system is just older technology and they are trying their best to adapt it to what people are looking for in today’s market. They are trying to compete with Starlink and I don’t think it is going very well.
I bought my IridiumGo before Starlink came out, and I haven’t used it once since we put Starlink on the boat. The only reason I even keep it on board, and the one advantage it has over Starlink is that if you ever have to use your liferaft you can take it with you to communicate and get yourself rescued. A much cheaper option is the Garmin InReach.
InReach
I purchased my Garmin InReach (formerly owned by DeLorme) for purposes of backcountry hiking and canoeing. In my fifties now, I like the option to not have to self rescue if something happens and I’m 50 miles from a cell phone tower.
That said, InReach has something to offer to the adventuring sailor. You can get weather, send a GPS tracking signal, send and receive text messages, and it also has an emergency button that will notify the appropriate authorities should you need to be rescued. It is far cheaper than the IridiumGo, but will not give you GRIB files for weather.
Starlink
Mounting the Dish
Mounting Starlink on a boat is going to be a little easier on a power boat, mount it to an unobstructed view of the sky and you are good.
On a sailboat it’s a little more difficult. The ideal solution on a sailboat is to mount it where it will not be obstructed by the mast and cannot get snagged by a stray line. A good solution is on a solar arch at the back of your boat in a way that doesn’t block the solar panels. We see a lot of people mounting them on fishing rod holders. We value the fish we catch too much to sacrifice a rod holder.
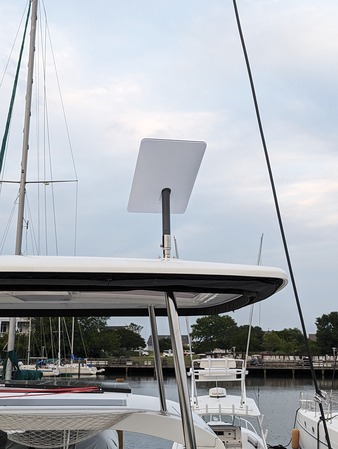
We mounted ours on the top of the bimini in a place that is impossible to be hit by anything like the boom and highly unlikely to be caught in any of the running rigging. I wanted something that looked like it came from the factory and I think we came up with a very good solution. Our only problem is it is relatively close to the mast, and sometimes it probably obstructs it a little. But everything on a boat is a compromise, and this is really no different.

At the time this mount below was not available, so we had to repurpose an existing flange on the top of our bimini. I hired a stainless fabricator to weld on the sleeve mount to our flange. This is an entire solution for much cheaper.

You also need to figure out how you are going to run the cable. My cable is not visible at all from the Starlink unit to the router, my cable is entirely enclosed in areas of the boat that are not in view. We ran it down the bimini support post, through the bowels of the boat ultimately ending up at our nav station where I would install all of the components.
Every installation is going to be a little different based on your boat and how it is configured.
120/220 Volt Installation
If you want to power your Starlink with the original factory router you will have to run it off of an inverter. Assuming that you already have an inverter, this is by far the cheapest and simplest option. The stock Starlink router runs off of 120 or 220 volts and 50/60hz. So whether you have a US or European boat, the router will work fine.
Some people install a small dedicated inverter that is only in use for the Starlink. This could be a good solution if you want to use the Starlink router, you could do it all in a cupboard or other enclosed area.
12 Volt Installation
When I put Starlink on Wild Rose I didn’t want to use our inverter to power it, it would have to remain plugged in to an outlet and I just didn’t have a good place to put it, and more importantly secure it, so it wouldn’t move around when going to sea. I basically wanted just the dish to be visible on the bimini and no other parts or pieces to be seen.
Starlink will run on a normal router, you do lose a couple of functions, but for us that was worth the trade-off of being able to run it from our 12 volt battery bank without the router. I have the RV model, so you would think the RV model would come with a router that would be easily mountable and also the ability to run it off of a 12 volt system. This is not the case. Maybe this is something Starlink will offer in the future.
Now, being an early adopter, when I installed my Starlink and wanted to run it from my 12 volt system, you had to cut the cables and crimp on your own RJ-45 connectors. I have done this myself with success. The Starlink connectors are wired differently than normal networking equipment, so you need to get the correct wiring sequence, which isn’t impossible, all of the information is available online. The main issue, that I experienced and also found out from a fellow cruiser who experienced this, he is a networking engineer, is that the wires are thinner than normal ethernet cable wiring. So, to get a good connection when crimping the cable is very difficult. My friend has literally crimped tens of thousands of networking cables and he had lots of difficulty getting a good connection. He had to do it several times, as did I.
The easier solution is to purchase aftermarket adapters to not have to cut your Starlink cables and re-crimp them. This is what you need:
12v to 48v Volt Converter
Starlink runs on 48 volts. So you will need to purchase an adapter which is cheap and easy to install. We have a 12v system so we got a 12v to 48v converter. If you have a 24 volt system you will need a 24 to 48 volt converter. So you wire this in to your 12 volt system, I used an open fuse block near my nav station to do this.

POE Injector
Next you will need a POE Injector (Power Over Ethernet) to take the 48 volt power to the Starlink dish. It infuses the ethernet cable wires (just the ones that need power) with 48 volt power. So you’ve got the 12 to 48 volt converter connected to your house bank, then you connect that to the POE Injector.

Starlink Cable Adapter
Coming from the other end, the Starlink dish, you need an adapter to plug in the proprietary Starlink cable coming from the dish. This basically converts the wires in the cable to be able to use a standard networking cable with RJ45 connectors. Once you have the Starlink cable plugged in to the adapter, the other end gets plugged in via the supplied cable to the POE Injector.

After this is complete, then you plug the POE Injector to your router. Any basic router will work, I used an older one I had on board. Some people are using very powerful routers that can reach to shore, I only care about having internet on my boat, so a simple one works for me. Be sure to check yours, but most routers will run on 12v systems. I already had this one and it was already wired into our house bank.
This is how my entire system is set up.

Please note how everything is mounted, and how the cables are all zip tied together. You don’t want anything coming loose at sea.
Other Considerations
Taking out the Starlink Motors – Some sailors have taken out the motors that orient the Starlink dish and keep it in a flat position pointed to the sky. There are videos and articles online on how to do this. I have met a couple people who have dones this. There are pros and cons. As of yet I have been reticent to do this myself and don’t see much benefit to it.
Gen 3 Flat Dish – Starlink has come out with a Gen 3 dish that mounts flat. This is a great solution for boats. The only issues are that it is a lot more expensive and uses a lot more power. We already had out RV, or Gen 2 version prior to this being available. From what I know now I would still have gotten the RV version. It works nearly flawlessly, is less expensive and uses less power.
Things change rapidly with Starlink – Going in to this realize that tomorrow Starlink can turn off any use at sea. This was my big hangup originally. Starlink does change their terms of service and has changed pricing, sometimes rapidly. We just have to realize this is a new company and generally a new industry. Expect that things are going to change.
Amazon Project Kuiper – Amazon is in Beta testing for it’s Project Kuiper. They are launching 3200 satellites for a communications array that is, from everything I have read, going to compete with Starlink. I am guessing this is a couple of years away from being anything a sailor will be able to utilize. But, competition is good and I think overall in the next decade we are going to have more, better, and cheaper options than what is available now.
Going Offshore – When we are close to shore (within a couple of miles) we use our normal Mobile – Regional plan. When we go offshore we toggle to Mobile Priority. DO NOT BE CONFUSED WITH THE MOBILE PRIORITY PLAN! The Mobile Priority plan is completely different and more expensive.
To toggle on Mobile Priority go the app, click on your account, then go to Data Usage. From there you can toggle on Mobile Priority. It is easier to do this close to land before you are out of range.
Please Note – I am not an electrician, nor am I a networking engineer or have any training or credentials in any of these areas. I am just a retail Starlink user. This is just the way I have installed my system with some consultation from people who are smarter in this area than I am.
Ship Log
Sign up below to be added to our email list for the Ship Log. We only post once or twice a month.